STM32F429 移植LittleVGL 8.2(4.3寸RGB 800*480,SDRAM双缓冲区,有触摸)

STM32F429 移植LittleVGL 8.2(4.3寸RGB 800*480,SDRAM双缓冲区,有触摸)

发现最近随便转载的很多啊,未经授权禁止转载!抄袭!!否则转载者死全家!!另外这是我的笔记,不是教程,难免会有错误,不具有很高的参考性,望周知。

移植LittleVGL 8.2

首先保证你的工程显示功能和触摸屏功能正常。

移植前需要完成的接口:

  1. 屏幕画点函数
  2. 触摸按下与释放识别函数
  3. 触摸坐标读取函数

OK,接下来进入正式的移植过程。

首先设置工程,使用AC6编译器,并勾选使用微库(因为工程中使用到了printf函数,不勾选会卡死)。

在工程中创建一个GUI目录,然后在GUI目录下新建两个文件夹:

解压lvgl-8.2.0.zip,将lvgl-8.2.0文件夹里的所有内容全部解压至lvgl目录中。

然后将lvgl目录下的lv_conf_template.hlvgl.h移至父目录,即lvgl目录中。

lv_conf_template.h更名为lv_conf.h

工程目录\GUI\lvgl\examples\porting下的所有文件复制到工程目录\GUI\lvgl_porting目录中:

同样更名,将所有文件中的_template去掉,改好后如下图:

打开Keil工程,在项目管理中添加如下组:

lvgl组中添加lvgl_conf.h文件:

lvgl/core组添加工程目录\GUI\lvgl\src\core下的所有.c文件

lvgl/draw组添加工程目录\GUI\lvgl\src\draw工程目录\GUI\lvgl\src\draw\sw下的所有.c文件

lvgl/extra组添加工程目录\GUI\lvgl\src\extra除了lib目录下的所有.c文件(因为这里并未用到这些解码库,当然也可以全部添加进去),这里子目录比较多,需要花一些时间。

lvgl/font组添加工程目录\GUI\lvgl\src\font中所有.c文件

lvgl/hal组添加工程目录\GUI\lvgl\src\hal中所有.c文件

lvgl/misc组添加工程目录\GUI\lvgl\src\misc中所有.c文件

lvgl/widgets组添加工程目录\GUI\lvgl\src\widgets中所有.c文件

lvgl/demos组添加工程目录\GUI\lvgl\demos\widgets中所有.c文件(这里可根据需要跑的demo来选择,这里选择widgets例程)

lvgl/porting组添加工程目录\GUI\lvgl_porting中所有.c文件

添加头文件搜索路径:

进行编译,会报lvgl.h错误:

1
2
3
4
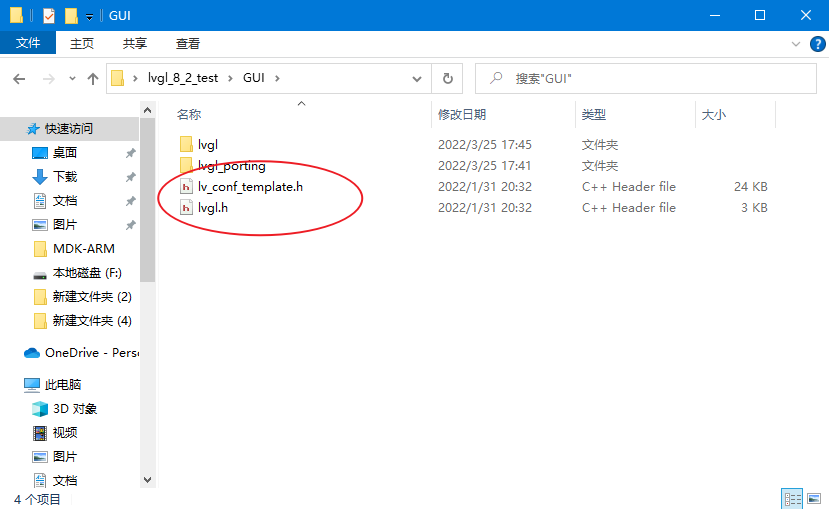
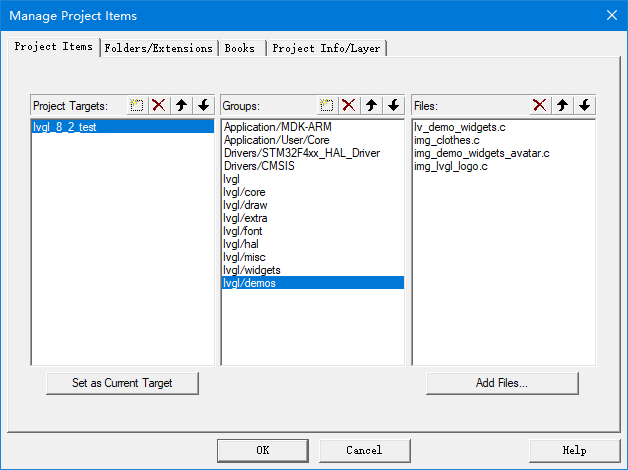
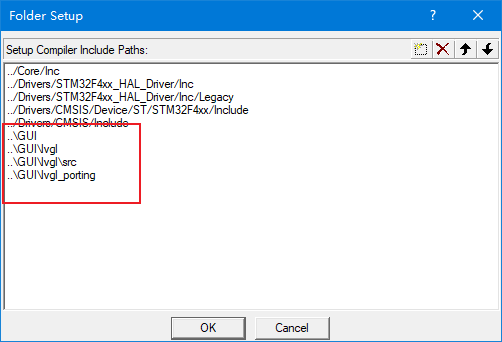
../GUI/lvgl/demos/widgets/assets/img_lvgl_logo.c(1): error: '../../../lvgl.h' file not found, did you mean 'lvgl.h'?
#include "../../../lvgl.h"
^~~~~~~~~~~~~~~~~
"lvgl.h"

根据代码提示,可发现是头文件路径错误。这里可以修改头文件路径为:

1
#include "lvgl.h"

当然也可以修改文件的路径,然后重新添加到工程,解决方式多种多样,这里不再过多赘述。

再次编译,0 Error(s), 0 Warning(s).可以了。

修改lv_conf.h

打开lv_conf.h文件的宏,打开LV_USE_DEMO_WIDGETS宏,如果不打开这个,widgets demo是跑不了的。

1
2
3
4
5
/*Show some widget. It might be required to increase `LV_MEM_SIZE` */
#define LV_USE_DEMO_WIDGETS 1
#if LV_USE_DEMO_WIDGETS
#define LV_DEMO_WIDGETS_SLIDESHOW 0
#endif

OK,再次编译,通过。

移植显示接口

打开lv_port_disp.c文件和lv_port_disp.h文件的宏。

修改lv_port_disp.c中的头文件路径:

1
#include "lv_port_disp.h"

修改lv_port_disp.h中的头文件路径:

1
#include "lvgl.h"

添加宏:

1
2
#define MY_DISP_HOR_RES   800
#define MY_DISP_VER_RES 480

屏蔽Example for 2Example for 3两个创建缓冲区的例子,只保留Example for 1

1
2
3
4
5
6
7
8
9
10
11
12
13
14
15
16
17
/* Example for 1) */
static lv_disp_draw_buf_t draw_buf_dsc_1;
static lv_color_t buf_1[MY_DISP_HOR_RES * 10]; /*A buffer for 10 rows*/
lv_disp_draw_buf_init(&draw_buf_dsc_1, buf_1, NULL, MY_DISP_HOR_RES * 10);

/*Initialize the display buffer*/
// /* Example for 2) */
// static lv_disp_draw_buf_t draw_buf_dsc_2;
// static lv_color_t buf_2_1[MY_DISP_HOR_RES * 10]; /*A buffer for 10 rows*/
// static lv_color_t buf_2_2[MY_DISP_HOR_RES * 10]; /*An other buffer for 10 rows*/
// lv_disp_draw_buf_init(&draw_buf_dsc_2, buf_2_1, buf_2_2, MY_DISP_HOR_RES * 10); /*Initialize the display buffer*/

// /* Example for 3) also set disp_drv.full_refresh = 1 below*/
// static lv_disp_draw_buf_t draw_buf_dsc_3;
// static lv_color_t buf_3_1[MY_DISP_HOR_RES * MY_DISP_VER_RES]; /*A screen sized buffer*/
// static lv_color_t buf_3_2[MY_DISP_HOR_RES * MY_DISP_VER_RES]; /*Another screen sized buffer*/
// lv_disp_draw_buf_init(&draw_buf_dsc_3, buf_3_1, buf_3_2, MY_DISP_VER_RES * LV_VER_RES_MAX); /*Initialize the display buffer*/

更改分辨率配置(不改会导致屏幕不显示)

1
2
3
/*Set the resolution of the display*/
disp_drv.hor_res = MY_DISP_HOR_RES;
disp_drv.ver_res = MY_DISP_VER_RES;

将屏幕画点函数与lvgl的接口对接:

1
2
3
4
5
6
7
8
9
10
11
12
13
14
15
16
17
18
19
20
21
22
/*Flush the content of the internal buffer the specific area on the display
*You can use DMA or any hardware acceleration to do this operation in the background but
*'lv_disp_flush_ready()' has to be called when finished.*/
static void disp_flush(lv_disp_drv_t * disp_drv, const lv_area_t * area, lv_color_t * color_p)
{
/*The most simple case (but also the slowest) to put all pixels to the screen one-by-one*/

int32_t x;
int32_t y;
for(y = area->y1; y <= area->y2; y++) {
for(x = area->x1; x <= area->x2; x++) {
/*Put a pixel to the display. For example:*/
/*put_px(x, y, *color_p)*/
LTDC_Disp_Point(x, y, *(uint16_t*)color_p); //屏幕画点函数
color_p++;
}
}

/*IMPORTANT!!!
*Inform the graphics library that you are ready with the flushing*/
lv_disp_flush_ready(disp_drv);
}

添加lvgl心跳

直接利用滴答定时器产生心跳。

1
2
3
4
5
6
7
8
9
10
void SysTick_Handler(void)
{
/* USER CODE BEGIN SysTick_IRQn 0 */

/* USER CODE END SysTick_IRQn 0 */
HAL_IncTick();
/* USER CODE BEGIN SysTick_IRQn 1 */
lv_tick_inc(1); //lvgl心跳
/* USER CODE END SysTick_IRQn 1 */
}

添加执行代码

在main.c中添加:

1
2
3
4
5
6
7
8
9
10
11
12
13
14
15
16
17
18
#include "lvgl.h"
#include "lv_port_disp.h"
#include "demos/widgets/lv_demo_widgets.h"
...
int main()
{
...
lv_init();
lv_port_disp_init();
lv_demo_widgets();

while(1)
{
lv_timer_handler();
HAL_Delay(5);
}

}

编译下载,效果如图:

因为还没有移植触摸接口,所以无法控制。

移植触摸接口

打开lv_port_indev.c和lv_port_indev.h的宏

修改头文件路径,同上,这里不在赘述。

屏蔽掉lv_port_indev.c中lv_port_indev_init函数里关于鼠标、键盘、编码器等代码,只保留触摸屏部分的代码。

1
2
3
4
5
6
7
8
9
10
11
12
13
14
15
16
17
18
19
20
21
22
23
24
25
26
27
28
29
30
31
32
33
34
35
36
37
38
39
40
41
42
43
44
45
46
47
48
49
50
51
52
53
54
55
56
57
58
59
60
61
62
63
64
65
66
67
68
69
70
71
72
73
74
75
76
77
78
79
80
81
82
83
84
85
86
87
88
89
90
91
92
93
94
95
96
97
98
99
100
101
102
103
void lv_port_indev_init(void)
{
/**
* Here you will find example implementation of input devices supported by LittelvGL:
* - Touchpad
* - Mouse (with cursor support)
* - Keypad (supports GUI usage only with key)
* - Encoder (supports GUI usage only with: left, right, push)
* - Button (external buttons to press points on the screen)
*
* The `..._read()` function are only examples.
* You should shape them according to your hardware
*/

static lv_indev_drv_t indev_drv;

/*------------------
* Touchpad
* -----------------*/

/*Initialize your touchpad if you have*/
touchpad_init();

/*Register a touchpad input device*/
lv_indev_drv_init(&indev_drv);
indev_drv.type = LV_INDEV_TYPE_POINTER;
indev_drv.read_cb = touchpad_read;
indev_touchpad = lv_indev_drv_register(&indev_drv);

/*------------------
* Mouse
* -----------------*/

// /*Initialize your mouse if you have*/
// mouse_init();

// /*Register a mouse input device*/
// lv_indev_drv_init(&indev_drv);
// indev_drv.type = LV_INDEV_TYPE_POINTER;
// indev_drv.read_cb = mouse_read;
// indev_mouse = lv_indev_drv_register(&indev_drv);

// /*Set cursor. For simplicity set a HOME symbol now.*/
// lv_obj_t * mouse_cursor = lv_img_create(lv_scr_act());
// lv_img_set_src(mouse_cursor, LV_SYMBOL_HOME);
// lv_indev_set_cursor(indev_mouse, mouse_cursor);

// /*------------------
// * Keypad
// * -----------------*/

// /*Initialize your keypad or keyboard if you have*/
// keypad_init();

// /*Register a keypad input device*/
// lv_indev_drv_init(&indev_drv);
// indev_drv.type = LV_INDEV_TYPE_KEYPAD;
// indev_drv.read_cb = keypad_read;
// indev_keypad = lv_indev_drv_register(&indev_drv);

// /*Later you should create group(s) with `lv_group_t * group = lv_group_create()`,
// *add objects to the group with `lv_group_add_obj(group, obj)`
// *and assign this input device to group to navigate in it:
// *`lv_indev_set_group(indev_keypad, group);`*/

// /*------------------
// * Encoder
// * -----------------*/

// /*Initialize your encoder if you have*/
// encoder_init();

// /*Register a encoder input device*/
// lv_indev_drv_init(&indev_drv);
// indev_drv.type = LV_INDEV_TYPE_ENCODER;
// indev_drv.read_cb = encoder_read;
// indev_encoder = lv_indev_drv_register(&indev_drv);

// /*Later you should create group(s) with `lv_group_t * group = lv_group_create()`,
// *add objects to the group with `lv_group_add_obj(group, obj)`
// *and assign this input device to group to navigate in it:
// *`lv_indev_set_group(indev_encoder, group);`*/

// /*------------------
// * Button
// * -----------------*/

// /*Initialize your button if you have*/
// button_init();

// /*Register a button input device*/
// lv_indev_drv_init(&indev_drv);
// indev_drv.type = LV_INDEV_TYPE_BUTTON;
// indev_drv.read_cb = button_read;
// indev_button = lv_indev_drv_register(&indev_drv);

// /*Assign buttons to points on the screen*/
// static const lv_point_t btn_points[2] = {
// {10, 10}, /*Button 0 -> x:10; y:10*/
// {40, 100}, /*Button 1 -> x:40; y:100*/
// };
// lv_indev_set_button_points(indev_button, btn_points);
}

修改touchpad_is_pressed函数,主要实现返回值,使返回值能够反映触摸屏是否按下。

1
2
3
4
5
6
7
/*Return true is the touchpad is pressed*/
static bool touchpad_is_pressed(void)
{
/*Your code comes here*/

return tp_dev.sta&TP_PRES_DOWN; //返回触屏是否按下
}

修改touchpad_get_xy函数,获取屏幕点击的位置。

1
2
3
4
5
6
7
8
/*Get the x and y coordinates if the touchpad is pressed*/
static void touchpad_get_xy(lv_coord_t * x, lv_coord_t * y)
{
/*Your code comes here*/

(*x) = tp_dev.x[0]; //获取触摸X位置
(*y) = tp_dev.y[0]; //获取触摸y位置
}

修改main.c中的代码

1
2
3
4
5
6
7
8
9
10
11
12
13
14
#include "lv_port_indev.h"
...
int main()
{
...
GT9147_Init(); //触摸芯片初始化
lv_port_indev_init(); //注册输入设备
while(1)
{
GT9147_Scan(0); //扫描触摸
lv_timer_handler();
HAL_Delay(5);
}
}

触摸屏部分适配完成 ,编译并下载,可以发现屏幕已经可以触摸了。

使用SDRAM缓冲加速

在iv_port_disp.c文件中添加宏:

1
2
3
4
5
#define LTDC_LCD_FRAMEBUF_SIZE        (MY_DISP_HOR_RES*MY_DISP_VER_RES*2)        //ltdc.c中ltdc_lcd_framebuf缓冲区的大小
#define COLOR_BUF_SIZE (MY_DISP_HOR_RES*MY_DISP_VER_RES) //全屏的大小
#define COLOR1_BUF_ADDR (uint32_t*)(0xc0000000 + LTDC_LCD_FRAMEBUF_SIZE)
#define COLOR2_BUF_ADDR (uint32_t*)(0xc0000000 + LTDC_LCD_FRAMEBUF_SIZE + COLOR_BUF_SIZE)

SDRAM空间从0xc0000000开始,LTDC_LCD_FRAMEBUF_SIZE需要作为显存,所以需要跳过。

缓冲区1从0xc0000000+LTDC_LCD_FRAMEBUF_SIZE开始;

缓冲区2从0xc0000000+LTDC_LCD_FRAMEBUF_SIZE+COLOR_BUF_SIZE开始;

修改Example for 3缓存创建方法,传入两个缓存的地址

1
2
3
4
5
    /* Example for 3) also set disp_drv.full_refresh = 1 below*/
static lv_disp_draw_buf_t draw_buf_dsc_3;
// static lv_color_t buf_3_1[MY_DISP_HOR_RES * MY_DISP_VER_RES]; /*A screen sized buffer*/
// static lv_color_t buf_3_2[MY_DISP_HOR_RES * MY_DISP_VER_RES]; /*Another screen sized buffer*/
lv_disp_draw_buf_init(&draw_buf_dsc_3, COLOR1_BUF_ADDR, COLOR2_BUF_ADDR, MY_DISP_VER_RES * MY_DISP_HOR_RES); /*Initialize the display buffer*/

修改缓存设置

1
2
/*Set a display buffer*/
disp_drv.draw_buf = &draw_buf_dsc_3;

编译下载,发现速度刷屏速度已有提升,FPS显示有33,但实际使用提升非常小,看来还需要使用DMA2D来加速。

坚持原创技术分享,您的支持是我前进的动力!